We’re going to go over IK chains mostly so I’ll have a reference for what I did. This may get a little bit into some technical details, but hopefully not too bad.
First, what is Inverse Kinematics? It’s simply trying to move a limb and have other limbs up to the torso move with it. So if you move someone’s foot, their leg (calves and thighs) will move as well. For now, we’ll only look at two bone IK. What I was struggling with was trying to move the robot’s hand and have the arm follow it.
Before getting to all that, there’s this thing in Unreal Engine called a control rig. What it is are widgets you can place around your character to move different parts and easily create character animations. Some can be for the eyes. Others can be for the head where the head will always follow a widget that you can move around. Makes it easy for your character to look at a specific target. One aspect of this rig would be to move the legs and arms. And that’s where IK comes in.
So if you move a control rig widget for the hand, you’d like the arm to follow. That’s it. You should be able to plug in a two bone IK component that comes with Unreal Engine and be done with it. Instead, this is what I got.
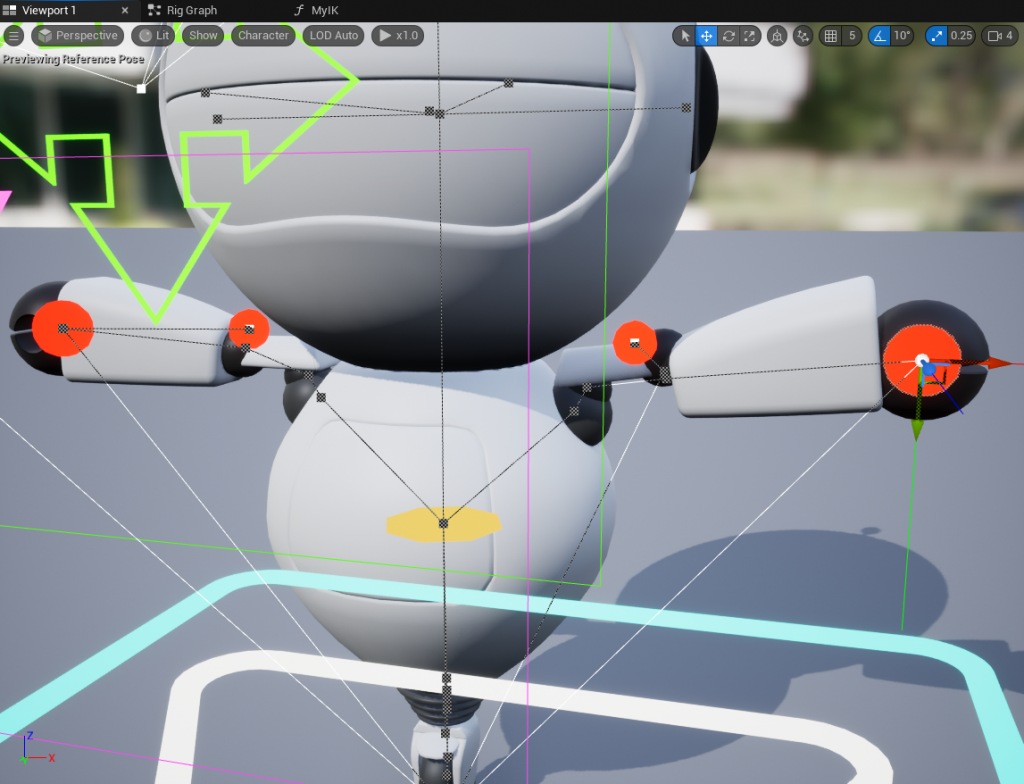
The image is a little busy, but the red circles are control rig widgets (as are the arrows). If you move the red circle on the hand, the arms should bend in to make room. There’s a widget for the elbow, but it’s not on the elbow itself. It’s behind it to tell the IK component in what direction to move the elbow.
Ok, so what’s going on here? The arm on the left of the image is not hooked up yet. It’s in the default T pose. The right side (left arm) is hooked up and notice anything strange? The forearm is rotated in place. The elbow is too far up and the hand is too far low. Basically, an offset has been applied and I have no idea why. I have used IK chains for many years. I know how to hook them up. I’ve used them before in Unreal Engine. This is very old hat for me. And it just gets worse if you try to move the arm. Sometimes the hand completely detaches from the body. Sometimes the arms go backwards. It’s ugly. I’ve tried all sorts of things and nothing. I did fix it, but not using an IK component that directly modify the bones’ transforms.
Let’s take a little break and change the topic a bit. I needed this because I wanted to implement the backwards transform for the control rig so I could make animations to chop trees. Forward transform is what I described above with the control rig. Reverse transform is so if you have an existing animation, it can be applied to the control rig so that you can edit and modify said pre-existing animation. I didn’t have the reverse transform set up, but when I did try to set it up, I noticed something was off with the arm and here we are.
As for the game, I’ve finished the asset management for foliage (trees, grass, flowers). I can swap out the foliage instance for an individual actor so that I can chop it down. There’s still plenty to do under the hood, but buildings automatically get assigned a worker. They can find their way to said building. They will enter it and they will perform the task for that building. In this case, I’m trying to get the treecutter to chop down some trees. He now exits the building and goes to the tree and is ready to chop it down. But I ended up down this rabbit hole trying to make some simple animations. He already has a blade. I just need to extend it, make a sweeping motion and let the tree fall. That’s it. I could have done it manually by tweaking individual bones, but no, I wanted a working control rig.
So how did I fix this? Since I have no idea why this is happening, I needed a different way to accomplish this. I know IK tools work. So I noticed unreal actually does have a really simple component that only takes 3 positions for IK. Normally, you need 5 (the elbow and hand control positions indicating where you want to move the arm). So how does this work?
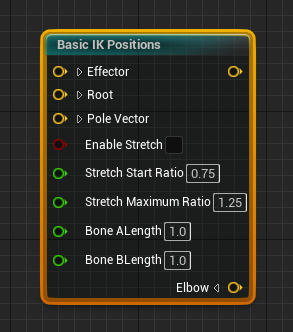
The trick is to notice the last two input pins. The Effector is where you want the hand to go. So this is the hand rig control position. The root is the first of the two bones. In this case, it is the location of the top of the arm (shoulder area). The pole vector is the direction that the elbow should go. So this is the elbow rig control position. Then you calculate the bone lengths in their original T pose. There are components to do this, so you just plug it in.
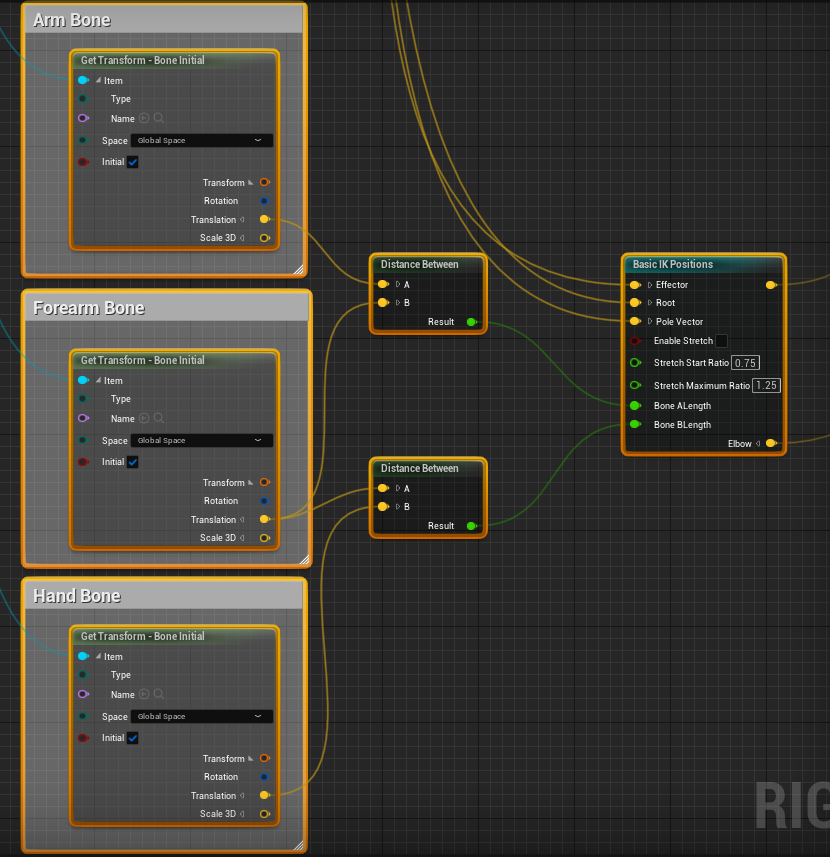
Notice the “Initial” pin. This is their starting position in the T pose. So you can calculate the original bone lengths avoiding any distortions. And they plug directly into the IK components. Easy!
Notice also that we DON’T use these transforms for the input of the IK component. We want the current position for those.
For debugging, I displayed the elbow and hand locations of where the IK component computed them. The positions are exactly where they should be. Now to move the arms.
I chose this Basic IK Positions component specifically because it did not alter the skeleton or bones of my character. Problem is we have to do that ourselves. This is surprisingly easy. I just used a couple of “Aim” components that come with Unreal Engine.
Aiming takes a bone that should be pointing at a certain target. It takes said target as input as well. And it has a secondary target because it needs to know what the “up” direction is for rotating laterally. So the input bones and targets are easy. It’s the upper arm and forearm bones respectively. And for the targets, they are the outputs from the IK component. That only leaves the secondary or “up” targets. For the upper arm, I just used a perpendicular vector from the triangle formed with the upper arm and the elbow control rig position. This is done by taking two vectors and taking the cross product. For the lower arm, I used the triangle of the upper arm and lower arm.
I put all this in a blueprint function so I can reuse it and this is what I get.
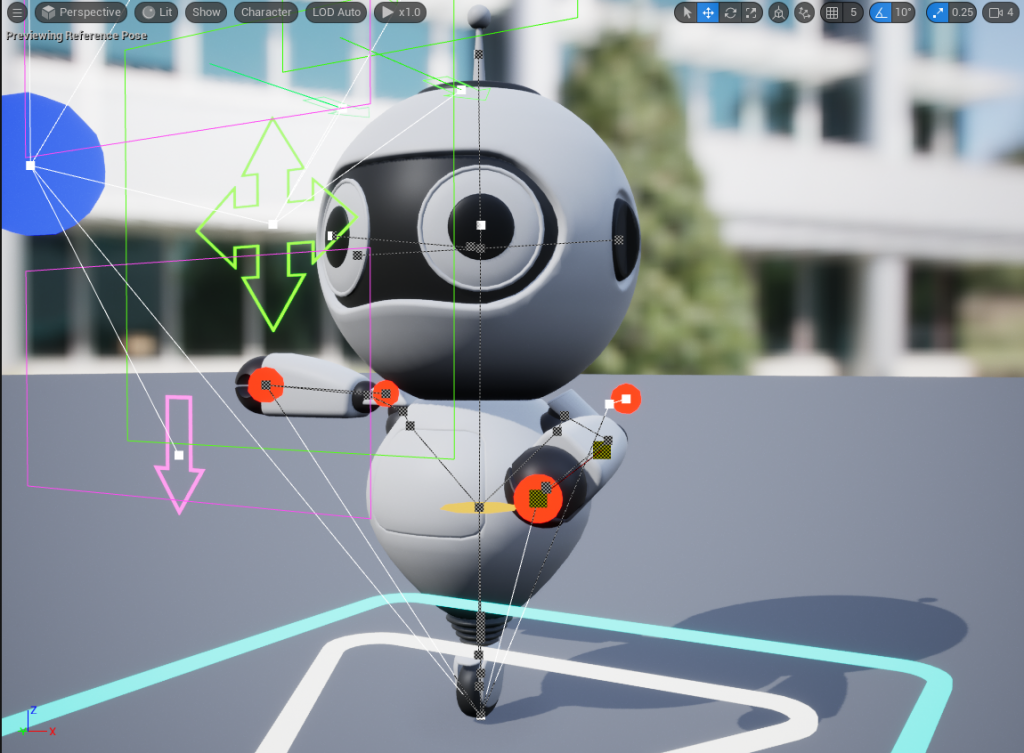
The arm looks like it should. I can move it around by moving the red circle on the hand and the elbow goes where it should. I also used the other controls to open the eyelids and set the pupil size just to show how this works. It’s a little busy, but it’s very flexible.
The next problem I have is the reverse transform. Taking the bone positions of the arm and placing the controls of the control rig in the correct location so that the arm remains in the same location. I’m not sure how to do that. That’s the next challenge. I was just happy to get this really annoying problem solved and thought I’d share the results. And again, this is why I chose a robot with no legs. I just didn’t want to deal with the animations and robots’ movements don’t need to look human. Even so, still not without its problems 🙂
Oh, forgot to mention a really nice bonus to my fix. In all existing implementations that rotate the bones for you, the hand would not rotate with the forearm and would look really weird on the robot when his hand is not aligned with the forearm. I think this is done so that when you move the foot for example, the foot stays aligned with the floor. But in my case, I don’t want this and just rotating the forearm rotates all the child bones automatically.