There may come a time when your blueprints just get way too confusing or too large to maintain. In my current game, I tend to use blueprints for UI because this is where there are a lot of binding events on buttons clicks, hovers, etc. So it’s just easier in a blueprint. But after a while, it could turn out like this. Here is a real screenshot from my game. Click on the image to see a larger version.
Note that this is a very technical discussion. If you just want an update on the game, I’m working on the UI and you can just scroll down and look at the screenshots 🙂 They’re still work in progress.
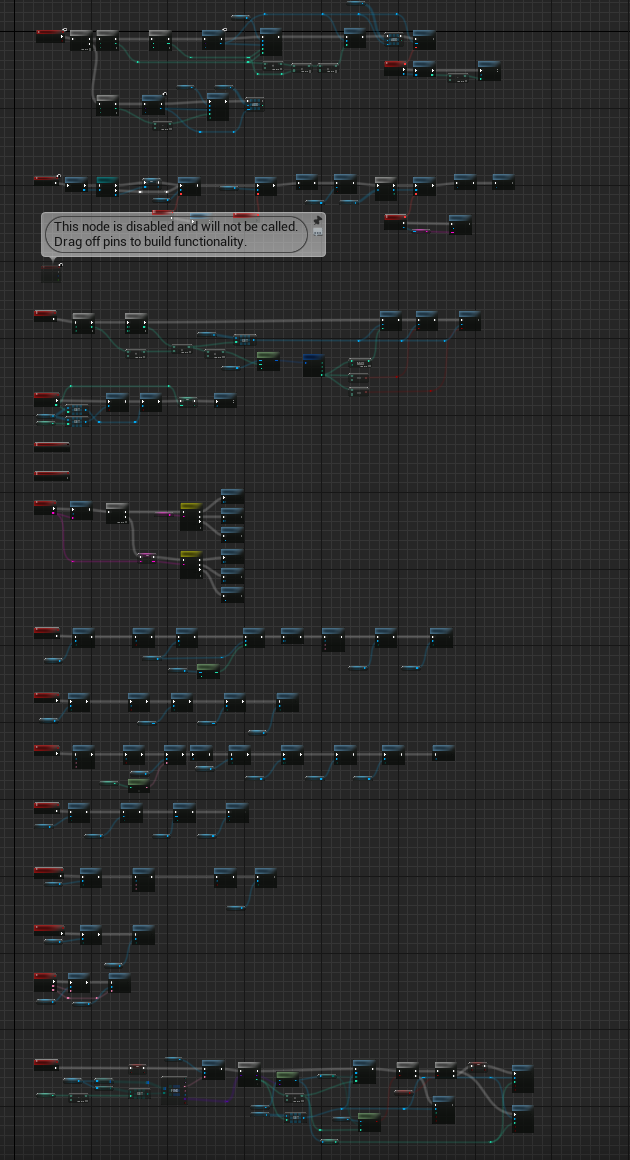
And the worst part is I’m not even done. Luckily, it’s not too difficult to convert this to C++. For this, we need to understand a few things.
First is how inheritance works. All Blueprints are derived from C++ classes. In recent versions of Unreal Engine, you can have blueprints derive from other blueprints with the use of slots, but that’s another discussion. For our purposes, we just need to add our own base class to our widget blueprints. But which blueprints do we add a C++ base class? It will likely be a lot of them. This can create a lot of C++ files. However, there’s a way around this as well that we’ll get into. To start, take the highest level blueprint that is becoming too large and add a C++ base class.
To do this, select the Tools menu and click “New C++ Class”. Then choose the exact same base class as your widget. It will usually be UserWidget, but could also be CommonActivatableWidget if you use CommonUI. Click Next. Type in a name for your class and click “Create Class”. Unreal Engine will try to build this new class using live coding. This will likely crash the editor, so make sure to save before doing any of this. You just need to recompile and relaunch the editor.
Now open up your widget and select the File menu and click on “Reparent Blueprint”. Select the C++ class you just created. Voila. You just added a C++ base class.
The nice part is that everything in C++ can be made accessible to your blueprint by adding “BlueprintReadWrite” (and “EditAnywhere”) to any UPROPERTY or “BlueprintCallable” to any UFUNCTION. If you’re not familiar with how to create properties and UE callable functions, then you’ll need to look that up.
So now you need to start moving variables to your C++ file. For basic types, this is simply adding a UPROPERTY for each variable. I tend to rename all my blueprint variables before doing this. So if I have a variable called “NumTabs”, I’ll rename it to “NumTabX” or “NumTabOld”. The reason for this is that it’s easier to avoid conflicts when you relaunch the editor. It’s a bit more work to refactor, but it’s worth it.
Now close the editor and rebuild. One thing you’ll note is that the C++ properties do not show up in the Variables panel. This is somewhat annoying, but you can still grab the property by right clicking in the blueprint and typing “Get NumTabs” for example and the property will show up. You just can’t drag it in anymore.
To replace the old value, right click on it in the variables panel and click “Find References”. In the new dialog, there is a binocular icon to the right. Click on it. This will search all your blueprints. Now you must replace all the references with your new C++ variable. It’s a bit tedious, but it’s cleaner and you avoid a lot of headaches down the road. Do this for each variable you converted to C++. When done, you can delete the Blueprint version of the variable. It will tell you if there are still references to it.
Replacing variables is ok, but there’s not much point if you can’t use them anywhere. These variable are used with other widgets. So now we are going to replace widget variables. Note that CREATING the widget (for those created at runtime) must remain in the blueprint unless you set the CLASS as a default variable in C++ that you can use to create the widget. This is because you cannot create the C++ class version of the widget as that’s the base class, not the full class. The full class is the Blueprint itself.
So how do we get access to blueprint widget references in C++ if we don’t create them? Well, there’s a way to bind widgets to properties so that you can use them in C++. You’ll only have access to methods defined in C++, but that’s usually good enough. If you need more access (for example if you created custom widgets), you can use the same technique here and/or add C++ methods that can be implemented in blueprints. We’ll get into that later.
For binding widgets as properties, we do NOT change the names. The editor will automatically update everything. So all you have to do is add this property to your C++ header.
UPROPERTY(EditAnywhere, BlueprintReadWrite, meta = (BindWidget))
TObjectPtr<UTextBlock> TextBlock_Points;
That’s an example of a TextBlock widget binding. One thing to note is that the property name must match EXACTLY what it is named in the Blueprint. Other widgets tend to have the same name with U added in front like UImage.
For any pre-existing widget, it’s that easy.
Now you can start converting your events to C++ functions (UFUNCTION) that are callable from blueprints.
To bind custom widgets, you will have to either bind to UserWidget class (where you will not be able to call custom events you added from C++) or add a custom base C++ class as done previously. Then you can bind to that class and move your events there so that Class 1 can call functions in Class 2.
If this starts to chain out of control, there is a way out.
Instead of converting every event, you can instead just declare a function that can be implemented in a blueprint. So this allows you to call blueprint code from C++.
In my game, there is a place where I want to show the Pause menu from C++ code. But the pause menu is completely implemented in blueprint. How did I do call this from C++?
UFUNCTION(BlueprintImplementableEvent, Category = “UI”)
void ShowPauseMenu();
By adding the above function in my C++ header, I then implemented it in the blueprint that has this class as its base class. You can override it in the blueprint by using the little dropdown in the FUNCTIONS header panel.
This is a way to avoid converting everything. This is useful in smaller custom widgets. You still need to add a custom base C++ class, but you don’t need to move all the variable or code down to it. You just add the functions you want access to and the base C++ class allows you to bind to it in other higher level widgets that’s you’ve added a C++ base class.
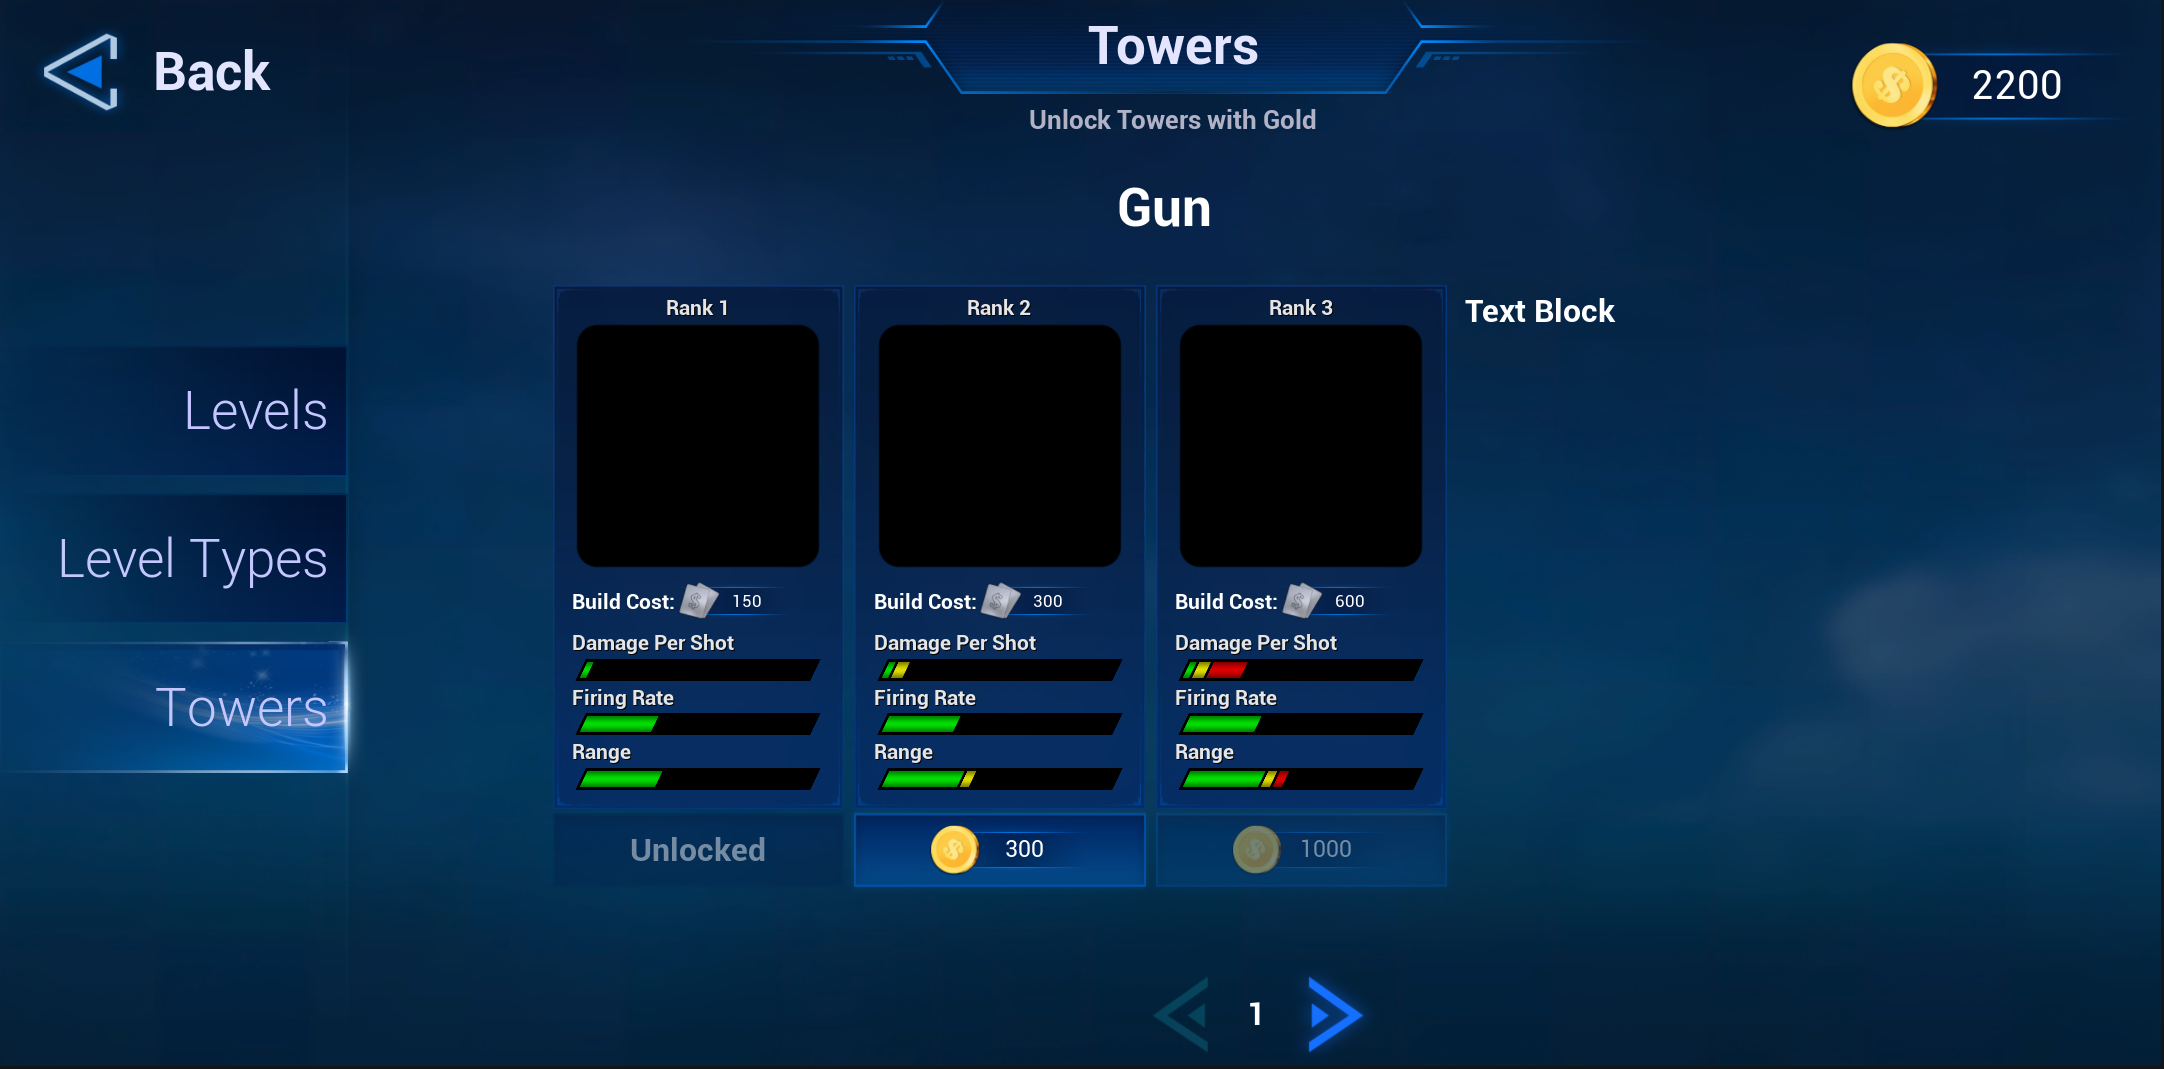
Here are a few examples of converting blueprint to C++. I have a screen for unlocking towers. It’s not complete yet. Still need to update the preview image and add longer description for example, but here’s a screenshot.
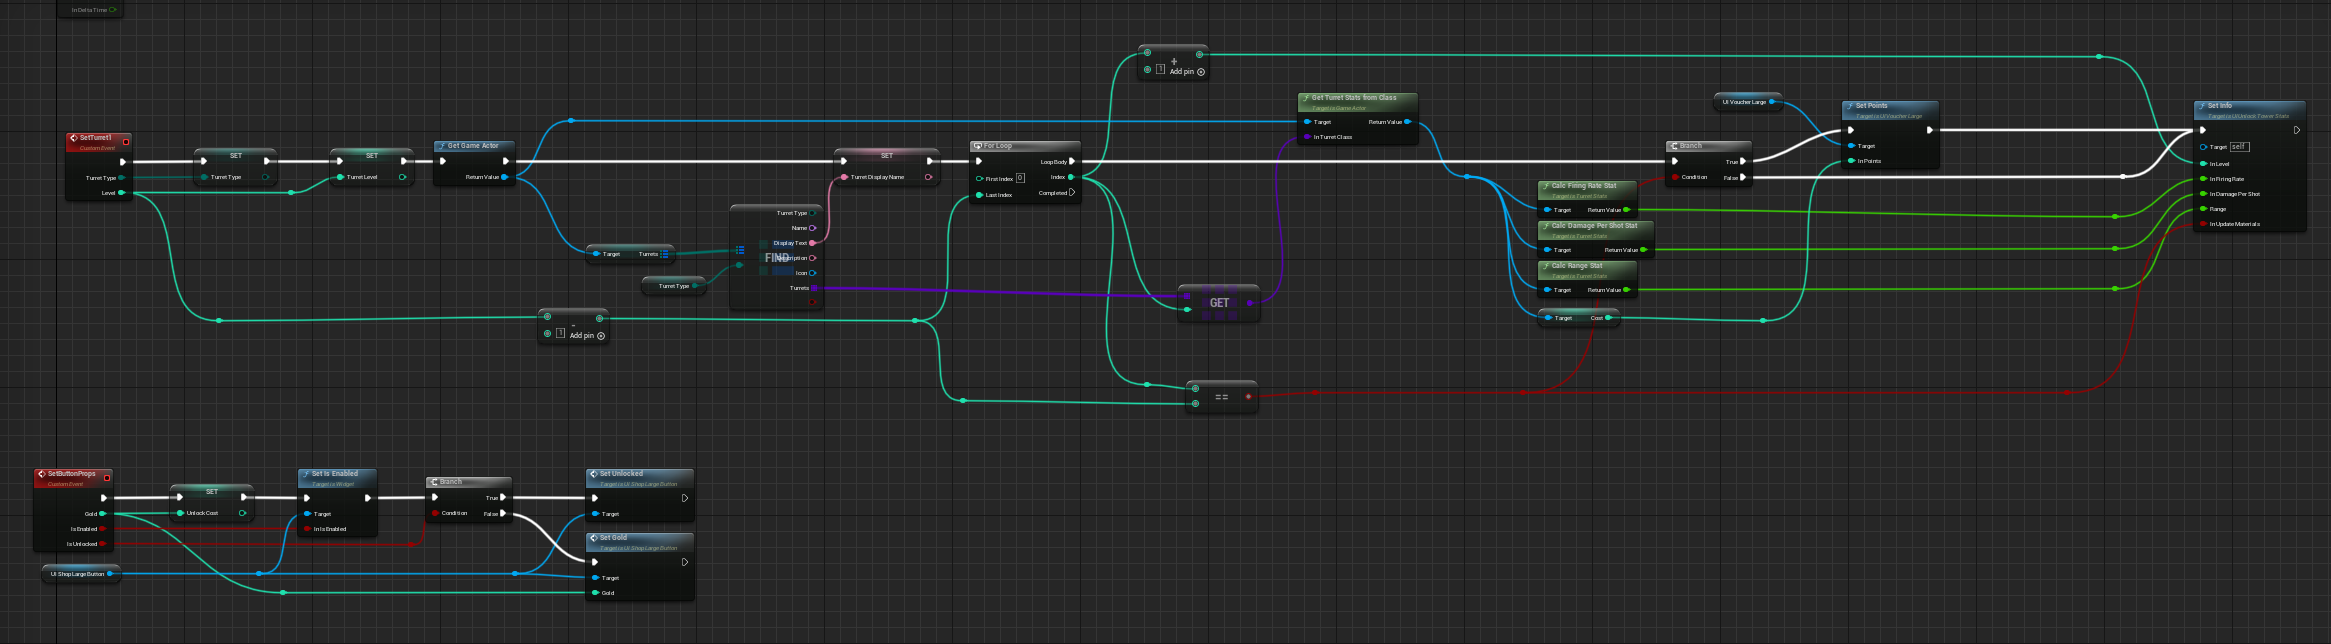
Here’s the blueprint graph just to fill in the data for each tower.
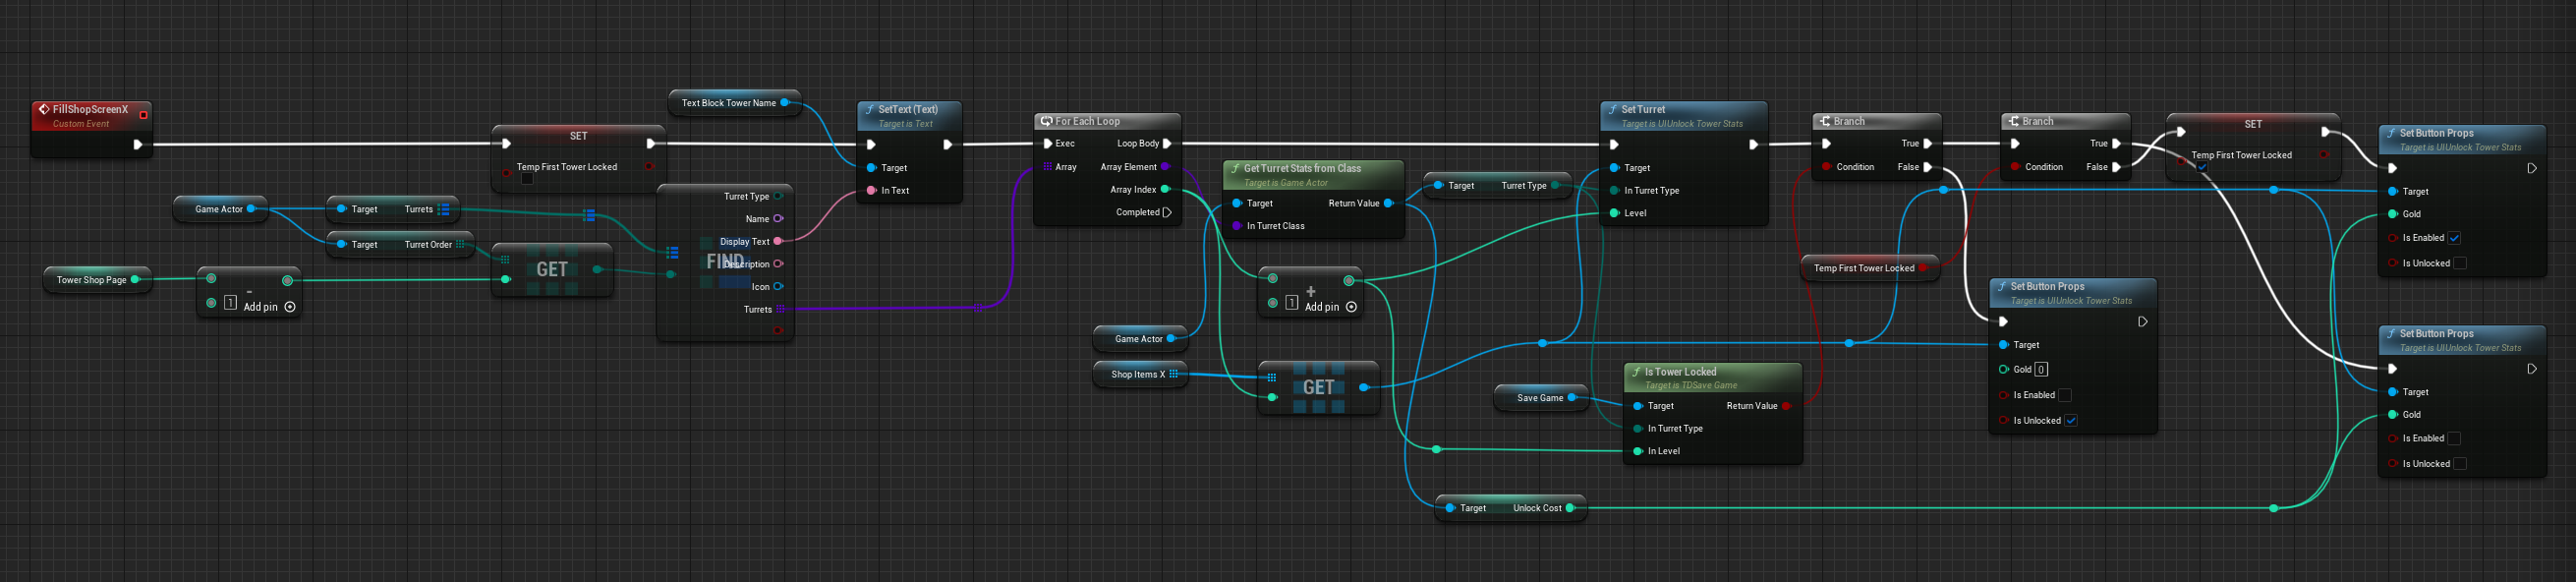
Just one graph like that isn’t too bad, but this is the bottom graph of the first image at the top. So it was getting way too complicated. After converting this to C++, here’s my code:
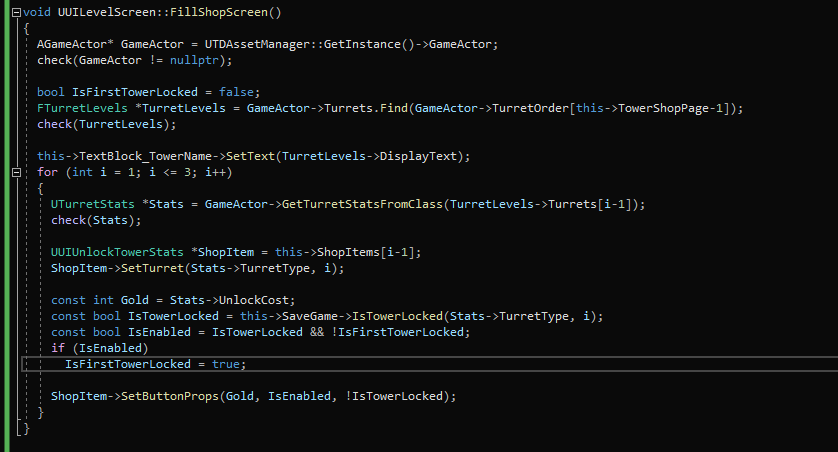
It is a 1 to 1 conversion. I find the C++ code much easier to read and maintain.
In the TurretStats widget, I had an event called SetTurret that sets up all the stats bars, cost, title, etc. You can see this function called in both the blueprint and C++ code above. Here is the blueprint version (the top graph).
Here is the C++ version.
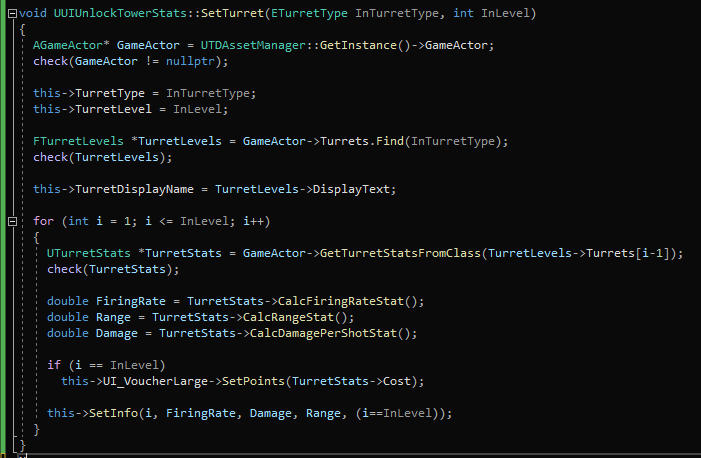
In the C++ code, it’s easier to see what’s going on. It’s just grabbing 3 stats and setting it on the current widget. It’s setting also setting the display name. The reason there’s a loop is so you can compare the new stats with the previous level’s stats. The stats are displayed overlapping each other as seen in the blue unlock screenshot above (in green, yellow and red bars).
I didn’t go into delegates or event bindings. Those are a bit more complicated. I tend to leave those in the blueprints though I have used them in C++. I had once tried to create a UE interface in C++ and make blueprints implement those methods so that I could call those methods from C++ instead of having to create C++ base classes for each widget. Well, there’s a little undocumented snag with that. You can’t call UE interfaces from C++ unless that interface is directly implemented in C++ as well. It will literally do nothing if you call a UE interface defined in C++ that is implemented in a Blueprint. Now, there is a way to call it. You need a pointer to the widget and you call Execute_MyFunction(MyWidget) instead of just calling MyFunction. Also, the references to the interfaces are whack when dealing with blueprints, especially if you’re passing them around. They’re not just pointers. Short story is that UE interfaces were not worth the pain.
What we have here is one scenario where converting to C++ is not done for speed at all. In fact, I’d be more than happy to keep everything as blueprints. But sometimes it’s just easier to write small snippets of C++ code. Blueprint is great for prototyping and if it doesn’t need much more work, leave it as a blueprint. But for things that need a little more setup, I find it’s just easier to code in C++. And yes, you can use the exact same techniques with actors and regular blueprints.
Finally, my levels screen.
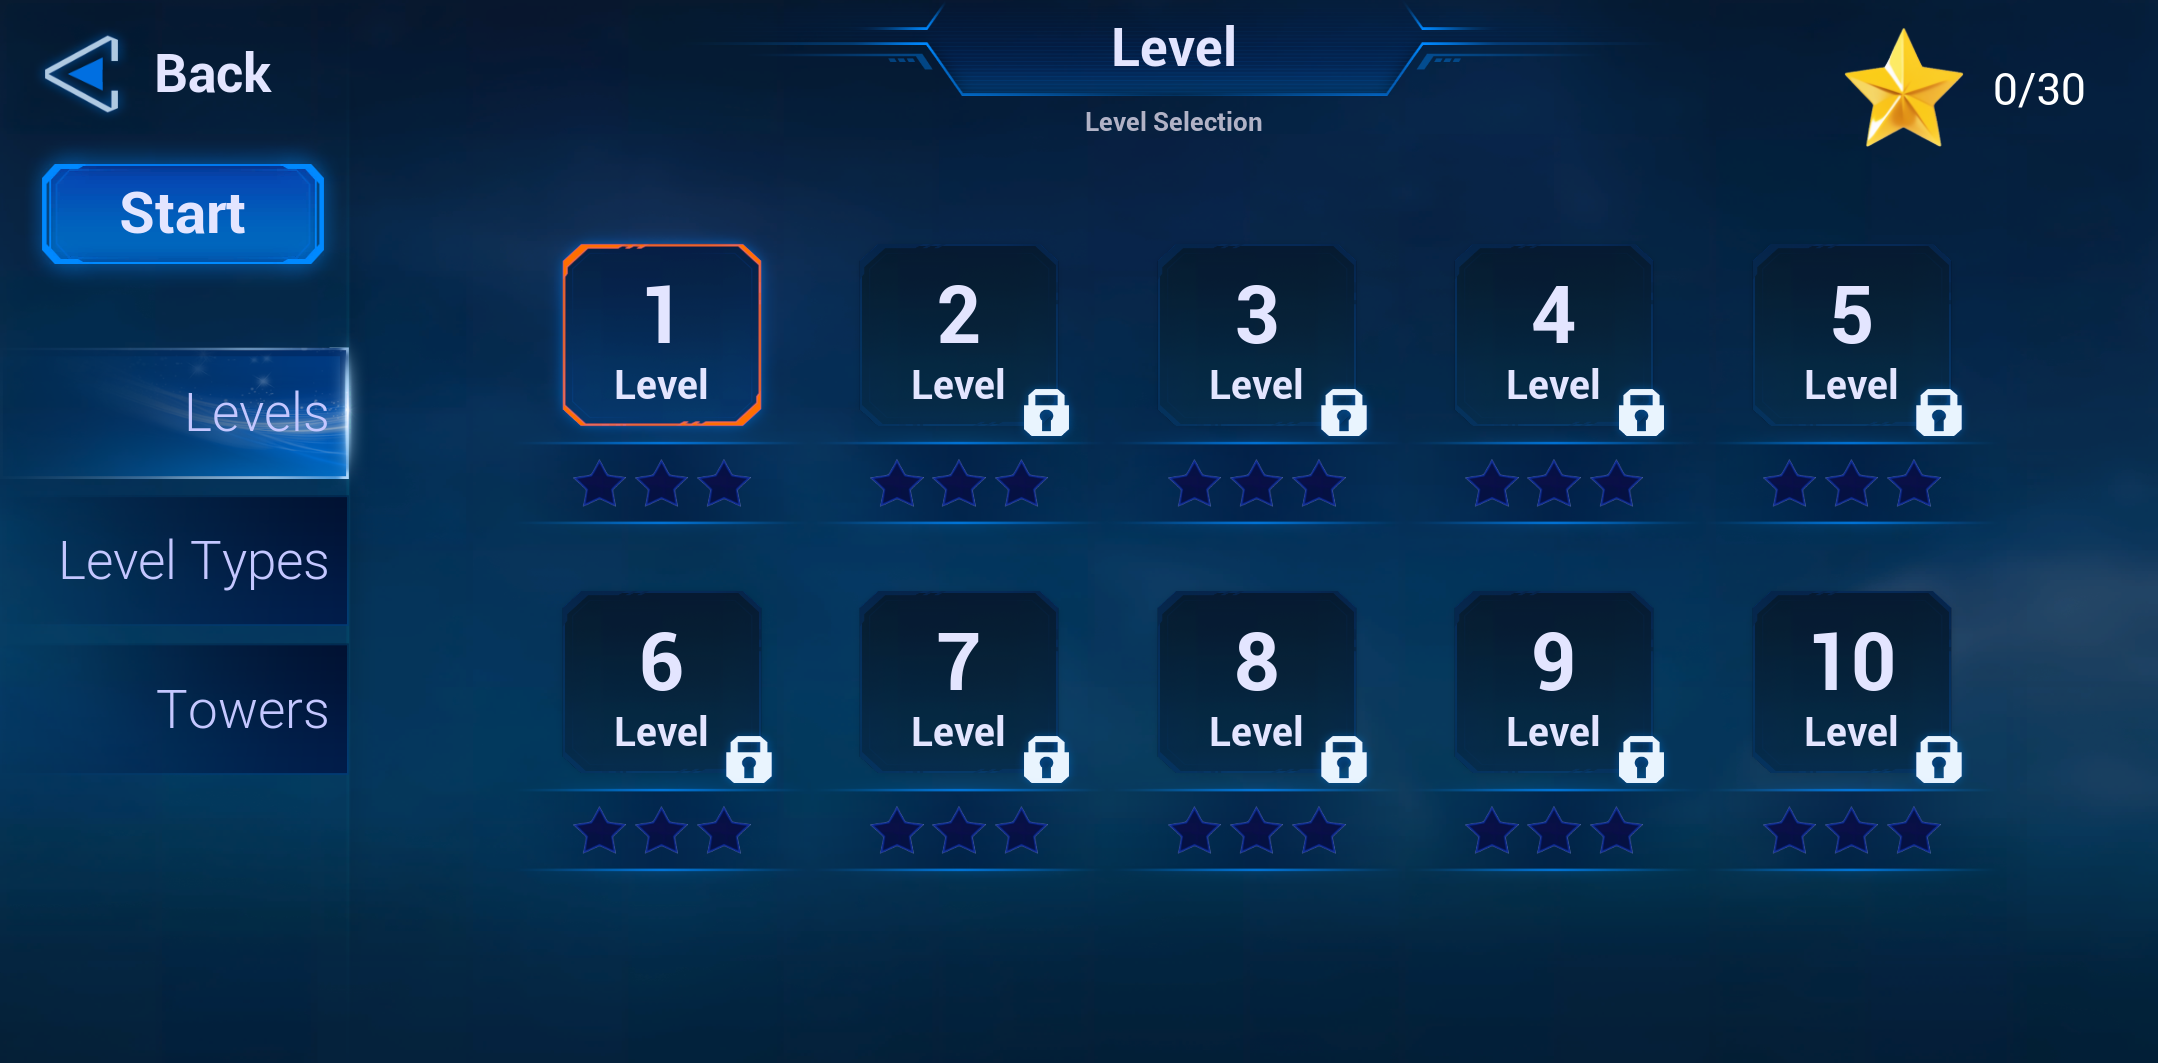
Once I’m done the tower unlock screen, I need to do a bit more work on the gameplay. I finally need to resolve what happens when a robot reached the end and what happens if you block off the path to the exit. Those are the last real issues left. I’ve written down a few ideas for more levels. So if I can make one or two half decent levels, I’ll likely make a demo. I’m starting to create my store page on steam and looking into making a game page. Stay tuned for that!